Overview
The Portal is an optional add-on module exclusively available within FoodBank Manager. It provides your team complete control over appointment availability, sends automated email notifications to keep guests informed, and provides guests with a smooth self-scheduling experience.
Note: The Portal module is available exclusively as an add-on within FoodBank Manager for $25/month per location. This is NOT a standalone product. To enable the Portal, please see our Subscribing to the Portal Add-On guide.
TABLE OF CONTENTS
- Overview
- Key Features & Capabilities
- Portal Settings Overview
- Managing Outreach Visibility & Reservation Slots for the Portal
- Quick Overview of the Guest Portal Interface
- Frequently Asks Questions
Key Features & Capabilities
The Portal includes powerful self-service and management tools designed to streamline your distribution workflow:
- Flexible Scheduling: Set up custom distribution dates, pick-up windows, and guest capacity limits to fit your operational workflow.
- Self-Service Reservations: Guests select open time slots online from any web browser, drastically reducing manual phone calls and intake queues.
- Online Item Pre-Selection: Allow guests to browse available inventory and select specific food items or parcels when booking, saving on-site packing time.
- Accurate Guest Forecasting: Gain real-time visibility into expected guest counts per slot, allowing your team to forecast foot traffic and prepare food quantities in advance.
- Automated Email Notifications: Keep guests informed and minimize no-shows by automatically sending appointment confirmations, updates, and timely email reminders directly to their inbox upon booking.
- Seamless FBM Integration: All reservations update directly in FoodBank Manager in real time, keeping your attendance records unified without double-entry.
Portal Settings Overview
The Portal Settings menu serves as the administrative hub for managing your organization's presence and communications within the online Portal. It consolidates public branding, guest visibility records, and automated messaging into a single configuration area.
Within this settings area, you can manage three main options: Pantry Identity & Visual Branding, Portal Guest Account Visibility, and Email Integration & Communication.
Pantry
Controls how your location appears online. This includes defining your unique Portal URL, publishing location and contact details, and using a drag-and-drop builder to design a custom welcome page complete with instructions and social links. To access this, navigate to Settings > Portal. On the left menu, select Pantry.
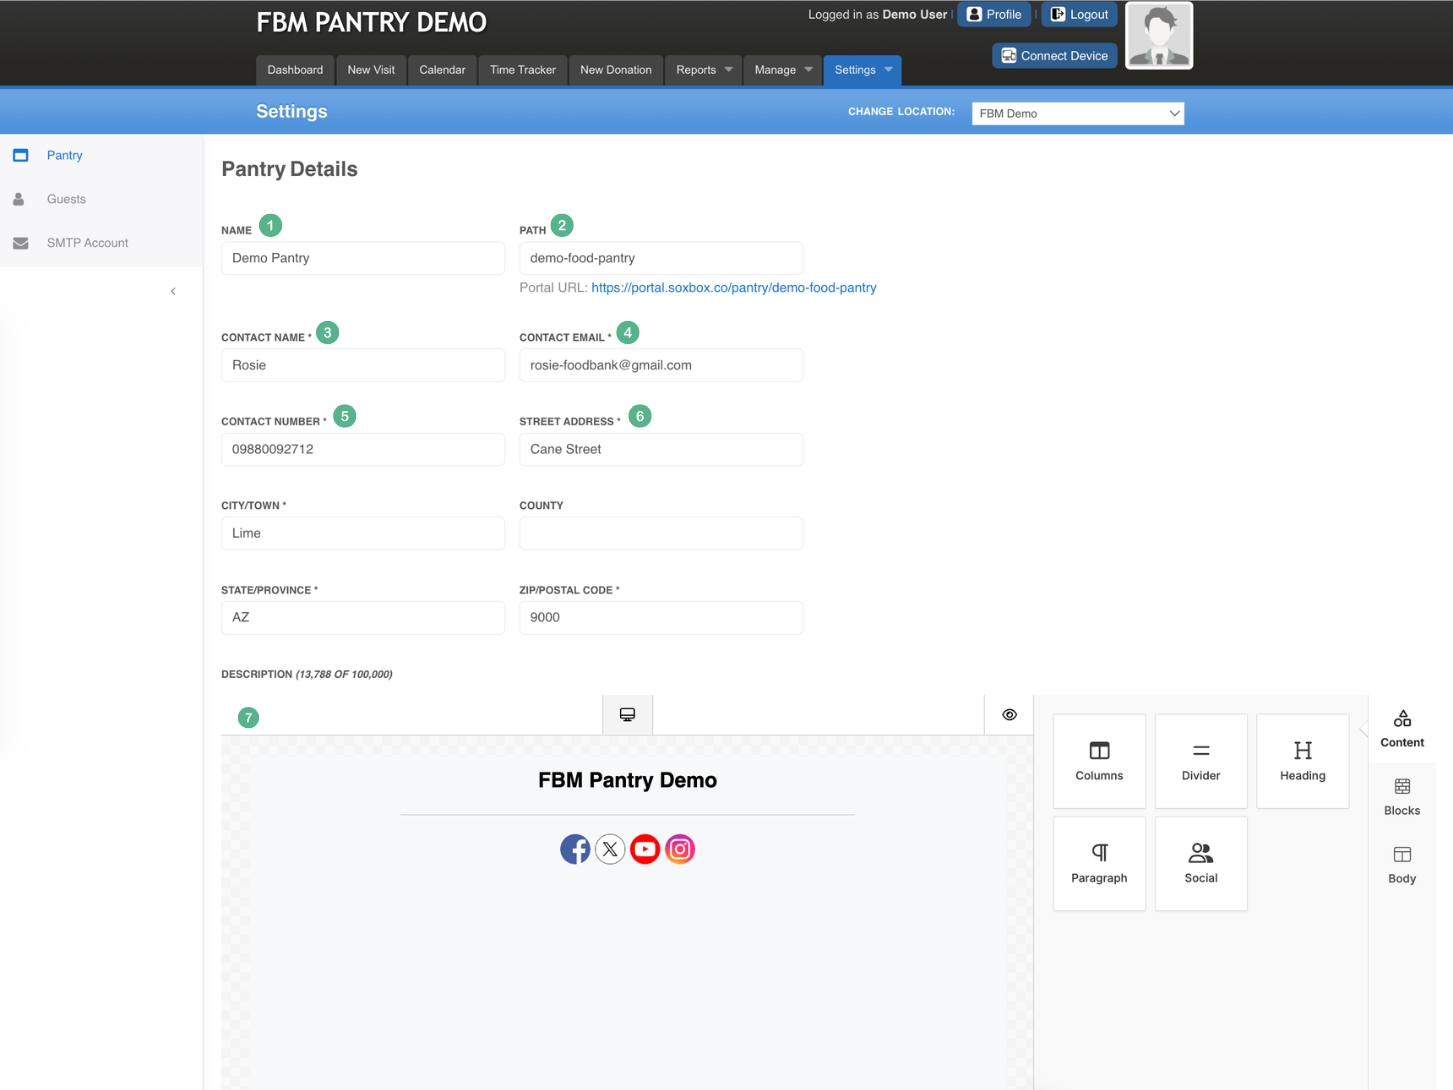
Name: The official pantry name that will be displayed in your online Portal.
Path: Your unique URL path that generates a shareable link where guests can make online reservations.
[https://portal-beta.soxbox.co/pantry/your-pantry-name].Contact Name: The primary contact person or department shown on the Portal to direct guest inquiries.
Contact Email: The email address published on the Portal for guest inquiries and support requests.
Contact Number: The primary phone number listed on the Portal for guest assistance and calls.
Physical Address: Your street address, city, county, state/province, and postal code displaying the location where food distribution occurs.
Description Editor: A drag-and-drop page builder where you can customize your welcome landing page. You can add and configure layout components—such as Columns, Dividers, Headings, Paragraphs, and Social Media links—to share operational details, special instructions, and key information with your guests.
Guests
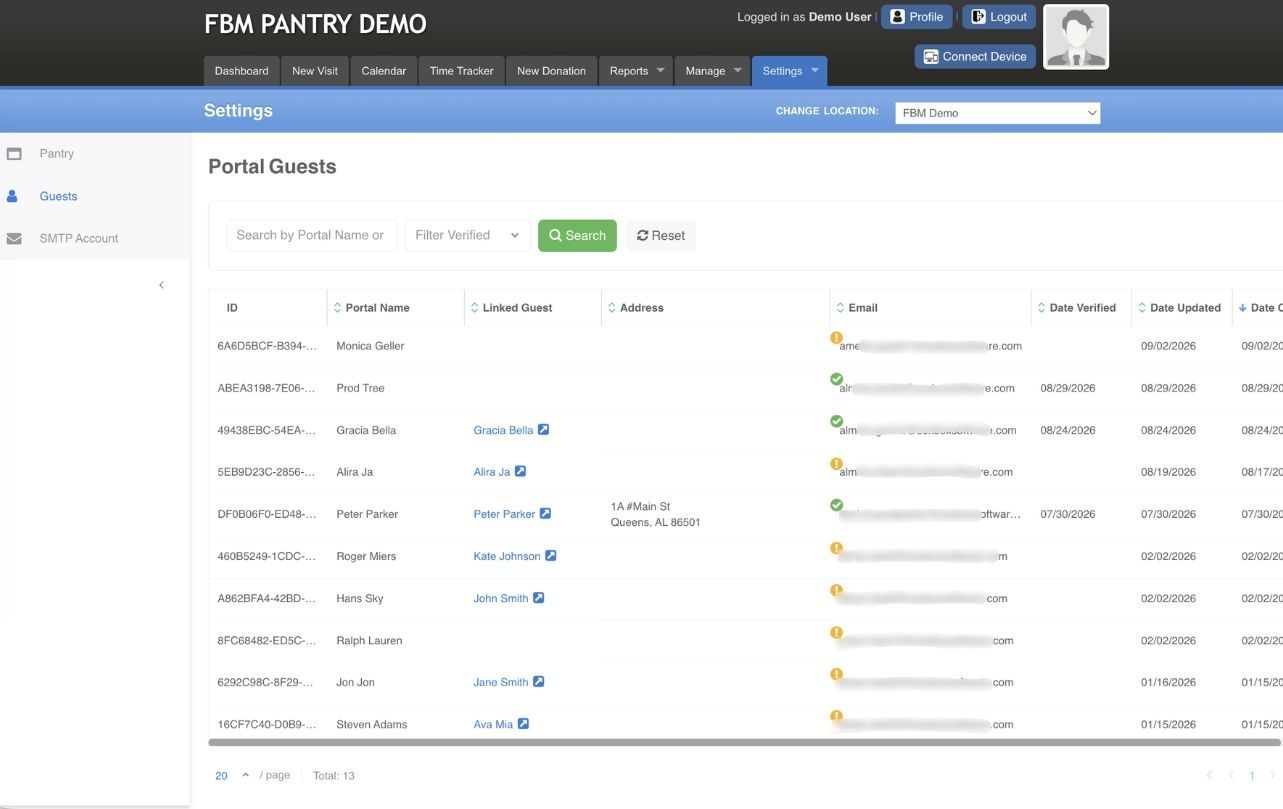
A centralized directory of all registered online Portal users. Staff can use this section to review guest registration details and confirm whether a Portal account is linked to an existing guest record in your FoodBank Manager database. To access this, navigate to Settings > Portal. On the left menu, select Guests.
Within the directory table, color-coded status badges next to each user's email address indicate their verification status:
Green Checkmark (Verified): Indicates the guest has successfully confirmed their email address through the verification link. A timestamp will also appear under the Date Verified column.
Yellow Exclamation Point (Unverified): Indicates the guest has registered for a Portal account but has not yet verified their email address.
SMTP Account
Configure your custom email server so automated Portal notifications—such as account verifications and reservation confirmations—are sent directly to your guests from your organization's official email address. To access this, navigate to Settings > Portal. On the left menu, select SMTP Account.
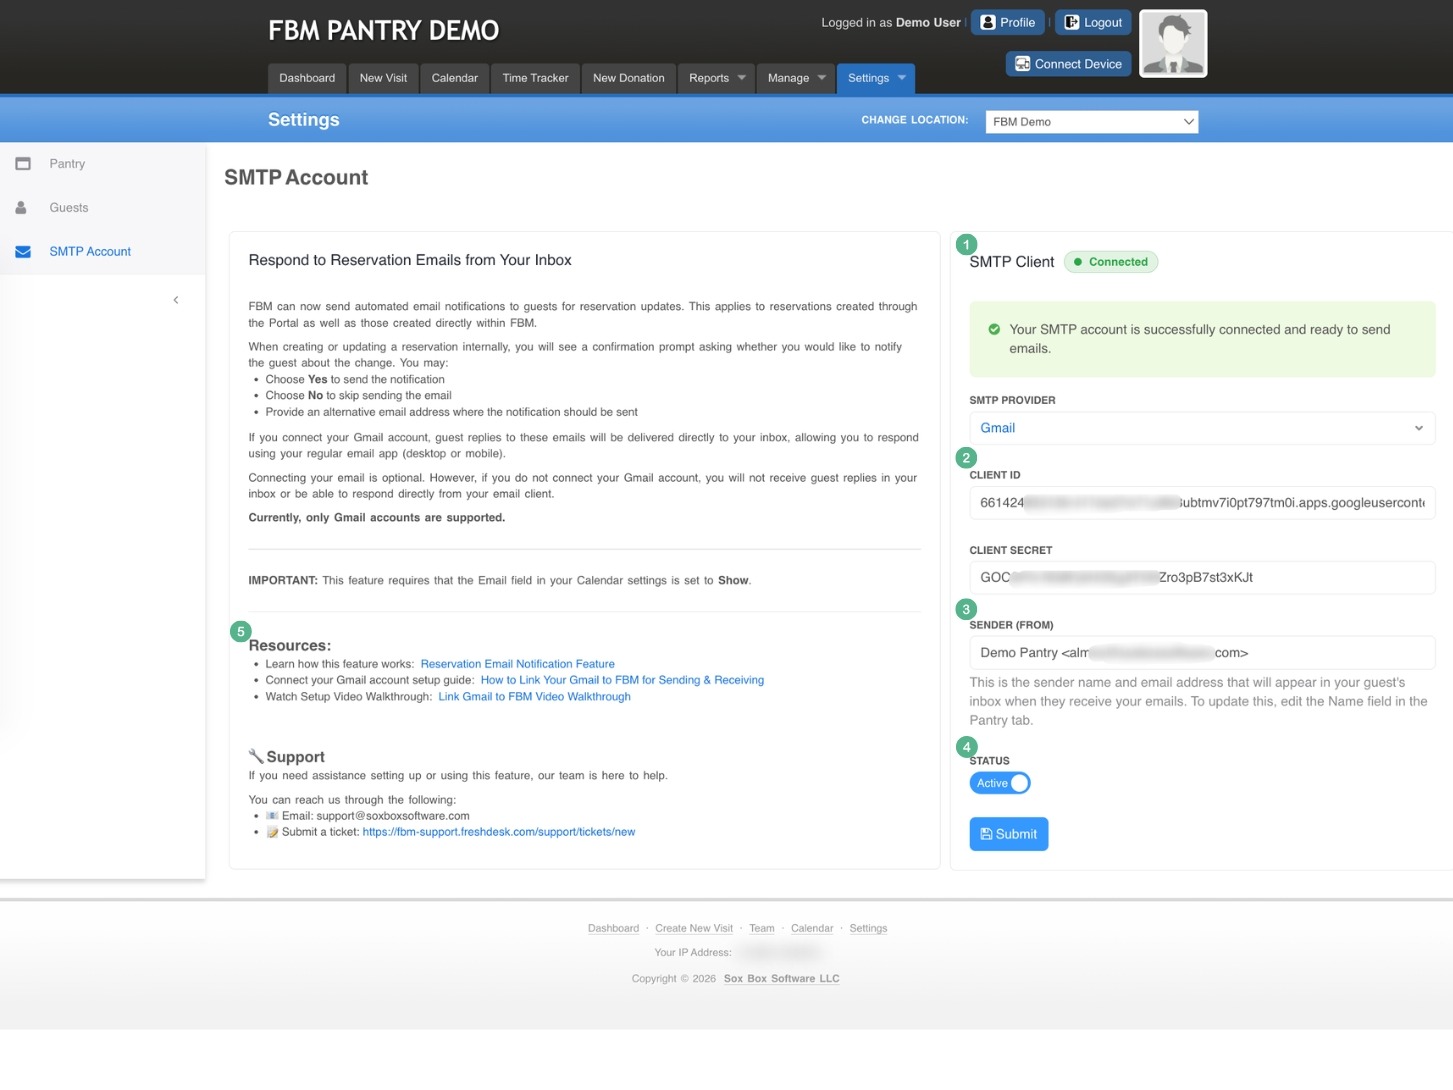
SMTP Client Connection Status: Displays whether your FBM account is currently connected to your Gmail (indicated by a green "Connected" badge).
SMTP Provider & Credentials: This is where you enter your email provider details and required credentials, such as the Client ID and Client Secret, to authenticate the connection.
Sender (From): Displays the sender name and email address that guests will see in their inbox. This information is updated via the Name field in your Pantry tab settings. Additionally, if guests reply to any automated email notifications, their messages will be sent directly to this reply-to address, allowing you to respond to them directly from your email.
Status Toggle: Allows you to activate or deactivate the SMTP integration while keeping your FBM connection to Gmail active. When this is toggled off, all email notifications are paused.
- Resources: Access step-by-step documentation and visual walkthroughs to guide you through setting up custom email communications:
Reservation Email Notification Feature: Learn how automated email notifications work for internal and Portal reservations, including trigger rules, status-based sending logic, included order details, SMTP reply configuration, Gmail sending caps, and multi-location "From" name management.
How to Link Your Gmail to FBM for Sending & Receiving: Learn step-by-step how to securely connect your Gmail account to FoodBank Manager by setting up Google Cloud Console credentials (Client ID and Client Secret).
Link Gmail to FBM Video Walkthrough: Watch a visual, step-by-step video demonstration showing how to connect Gmail to your SMTP account—from generating your Client ID and Client Secret in Google Cloud to authorizing the connection and activating automated Portal emails.
Note: Configuring your SMTP account is not mandatory for using the guest Portal. Your online Portal will remain fully accessible, and guests can book reservations normally without SMTP enabled. However, without it, you will not be able to send email notifications, and guests will not receive automated booking confirmations or updates.
Managing Outreach Visibility & Reservation Slots for the Portal
Take complete control over when Outreach events appear to guests on the Portal and precisely manage reservation slot availability. Customizing these visibility and timing settings helps prevent overcrowding, streamline check-ins, and ensure guests have clear, up-to-date access to upcoming food distributions.
Part 1: Configuring Portal Settings on Tracking Methods
Before an Outreach event can appear on the Portal, its associated Tracking Method must first be configured for portal display. Customizing these settings determines where the event appears, how it is labeled for guests, and how incoming bookings are processed.
Go to Settings > Tracking Method.
Select Edit next to the desired Tracking Method and scroll down to PORTAL SETTINGS.
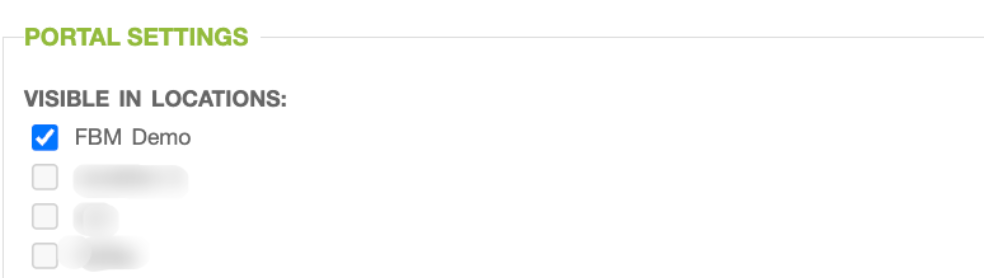
VISIBLE IN LOCATIONS: Check the box for each location where you want this Tracking Method to be visible on the Portal.
(Optional) Public Label: Enter a guest-facing title to replace internal staff terminology on the Portal.

(Optional) Public Description: Use the text editor to add extra details, instructions, or welcome notes for guests.
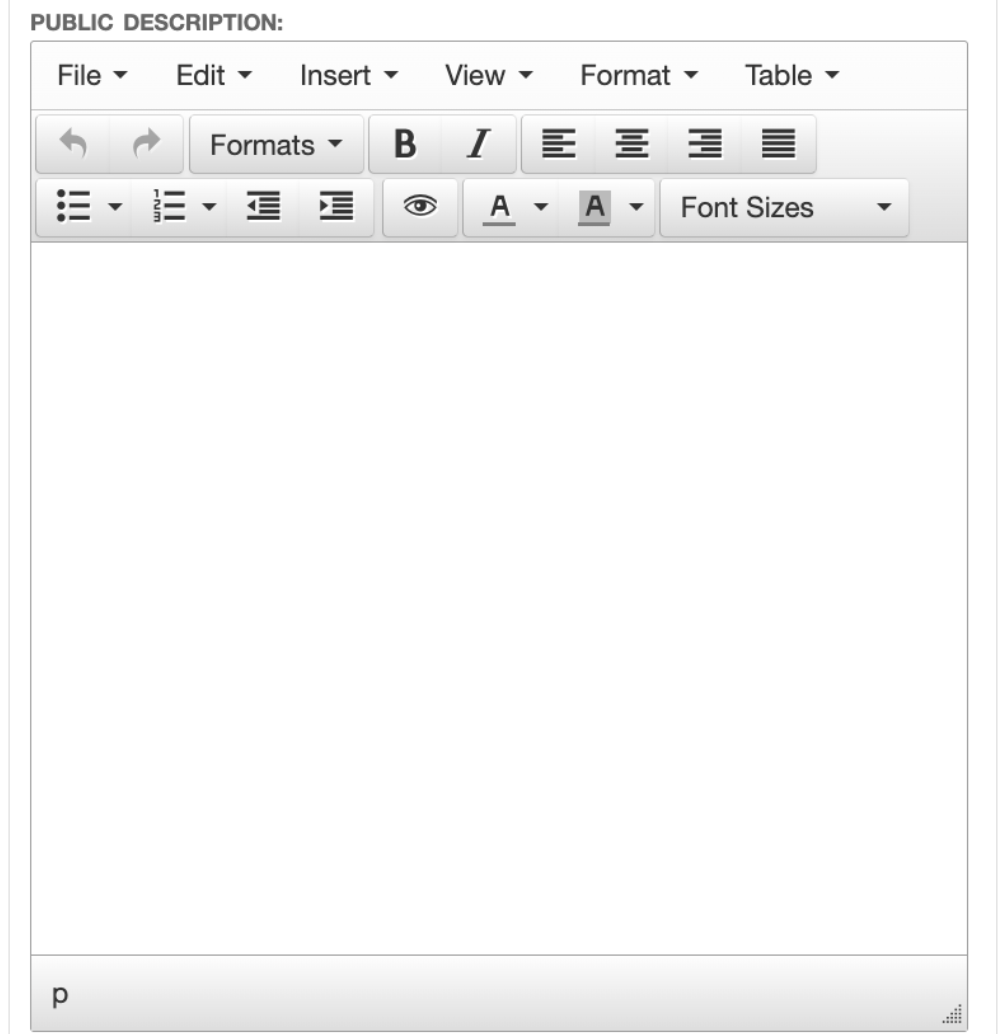
(Optional) Reservation Default Status: Choose the initial status automatically assigned when a guest submits a booking:

Pending: Keeps the reservation in a pending status for staff approval before sending a final confirmation to the guest. To review all pending reservations, navigate to Manage > Reservations > Pending.
Confirmed: Automatically approves the booking immediately, securing the guest's slot without requiring staff action.
Click Save to apply the changes.
Part 2: Configuring Outreach Visibility & Reservation Timing
Once your Tracking Method is enabled for the Portal, navigate to Manage > Outreaches > Edit to configure the Outreach visibility and reservation settings described below.
Set Operating Hours - Select the Start Time and End Time to establish the active hours for the outreach event.

Define Slot Durations & Capacity - Structure your outreach schedule into designated time blocks and manage crowd flow by limiting how many reservations can be placed in each slot.

Reservation Duration: Select how long each booking time block lasts. If left unconfigured, the entire outreach operates as a single time block.
Reservations Per Duration: Set the maximum number of guests allowed per time block. If set to 0, this means the reservations are unlimited.
Adjust Visibility Windows - Control when outreach events automatically appear on or disappear from the Portal relative to their scheduled times.
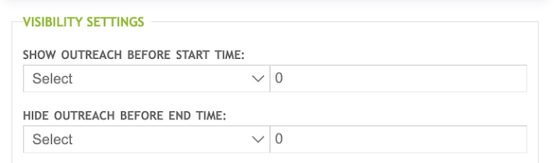
Show Outreach Before Start Time: Specify how far in advance (in hours or days) the outreach appears on the Portal before it starts. (Note: If left unconfigured, the outreach will remain available on the Portal at all times.)
Hide Outreach Before End Time: Select a time frame to automatically remove the outreach from the Portal prior to its conclusion.
Set Reservation Visibility
To make the outreach event visible and available for online guest bookings, select Yes - Portal Only or Yes - Portal & Pantry
Quick Overview of the Guest Portal Interface
Below is a sample guest Portal layout illustrating what guests see when making reservations. 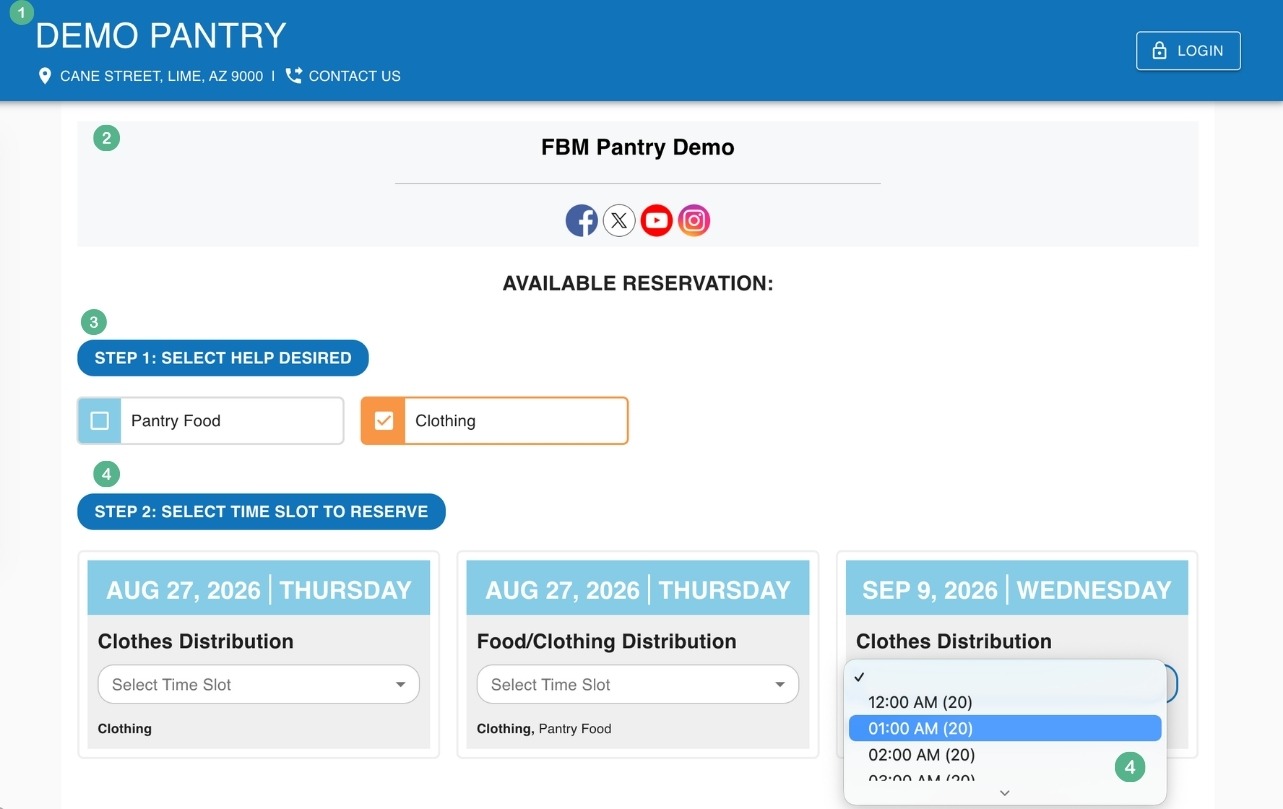
Header & Contact - Displays the pantry's name, address, and contact link. The information displayed here is configured in your Portal Settings.
Pantry Description - This area is fully customizable. You can enter custom guidance or welcome text via Settings > Portal > Pantry, as well as display links to your organization's social media platforms.
Select Help Desired - Displays interactive service options (e.g., Pantry Food, Clothing) configured in your distribution settings. Guests select one or more checkboxes to filter and display only the available reservation dates matching their specific needs.
Select Time Slot to Reserve - Displays available outreach event cards based on the selected services:
Event Card: Shows the event date, day of the week, public title, and included Tracking Methods.
Time Slot Dropdown: Allows guests to choose an available arrival window.
Capacity Indicator: Displays real-time remaining spots in parentheses next to each time block (e.g., 01:00 AM (20)) to prevent overbooking.
Need step-by-step booking instructions for your guests?
Share these guides with your guests:
Creating a Reservation as a First-Time User
Creating a Reservation with an Existing Guest Portal Account
Frequently Asks Questions
Can guests cancel or reschedule their reservations online?
Yes. Guests logged into their Portal account can view, modify, or cancel their upcoming reservations directly from their dashboard without needing to call staff.
What happens when a time slot reaches maximum capacity?
Once the capacity limit for a specific time block is reached, that slot will automatically become unavailable for selection in the dropdown menu to prevent overbooking.
Can guests pre-select items or parcels when booking a reservation?
Yes. If the item pick list is enabled for an outreach, guests can choose specific items or pre-configured food packages during reservation.
Was this article helpful?
That’s Great!
Thank you for your feedback
Sorry! We couldn't be helpful
Thank you for your feedback
Feedback sent
We appreciate your effort and will try to fix the article